Showing posts with label easy hair style. updo. Show all posts

Thursday, October 6, 2011

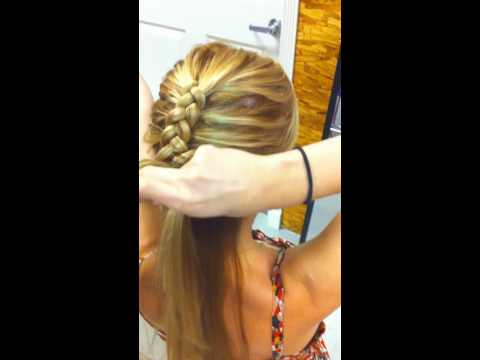
Fish Scale French Braid

What you'll need
small clear or hair colored elastics
Moose/hairspray
Brush/comb

Brush through hair and texture with desired products to eliminate fly aways and insure hair looks as desired. Create a V section at the top of your head, set aside for later. At the outer part of your eyebrow arch slide your finger up through your hair at an angle to the center part on each side and french braid to the crown. French braid the center section to the crown of your head, taking a small section from the left braided section ends incorporate into the center french braid. Taking a small section from the right braided section ends incorporate into the center french braid. Repeat this until you run out of the outer braided ends. Taking a small section just under the outer braids along the hairline incorporate it into the french braid. Continue this taking only small sections from along your hairline and bringing them over the remaining hair and incorporating it into the french braid. Once you've collected the last sections at the nape of your neck finish braid to the ends. Hair spray finished hair and your finished.


Wednesday, October 5, 2011

Knotted updo

What you'll need
bobbypin
brush/comb
gel/moose/hairspray(texture)
hair decor(optional)

Brush hair and texture throughout. At desired starting point take a finger to two finger width section of hair. Tie hair into a knot just behind your ear at the nape of your neck, pull knot into desired shape and bobbypin in place. Adding the ends of the last knot continue this around your head each knot at the nape of your neck. At the last knot twist hair pulling at the twisted hair releasing small sections and tie tightly twisted and released hair into a knot. Pin ends under knots and hairstyle is complete. Add hair decor if desired.

Runway inspired braided updo

What you will need:

Elastic
Hair gel/moose/hairspray
Brush comb
Bobbypins
Hair decoration (optional)
A chair or something to sit on...trust me

This is a fun sexy hairstyle and so easy to do.
Flip your head upside down and brush through hair completely and add chosen hair product to texture it. Begin at the base of your neck and reverse french braid or dutch braid hair working your way up your head. When you reach your crown begin incorporating the rest of your hair so that when you reach the top of your crown all hair is included. Pull at sections of the braid to create a loose rings braid. Continue pulling on the braid past the crown of your head to create large rings in your braid and tie off. Flip your head upright and drape your braid over itself and tuck ends under to hide.

Knot updo/half updo

What you will need
Bobbypin
Hairspray/Gel/Moose
Brush/Comb
Hair elastic

Taking the top fourth of your hair split top section into thirds. Drop center section, tie the two outer sections into a knot(knotted ends should be in the top/bottom part of the knot). Gently back comb slightly the top end of the knot to insure hold and stability and bobby[in place. Taking the next fourth of your hair split section into thirds. Drop center section, tie the two outer sections into a knot(this knot's ends should be on the left/right side of the knot)over the first knot ends bobby pin in place.  Now you can either leave as is as a half up half down updo or continue to tie the second section until you have a good inch of hair left. wrap around remaining hair until you reach the ends combined behind the hair back comb to secure hold and pin in place. For a more dramatic look back comb remaining hair ends and smooth.

Tuesday, October 4, 2011

French Braided bun

What you will need
bobbypins
brush/comb
gel/moose/hairspray(texture)
hair elastics small and large

Brush through hair and texture as desired, split hair  into two vertically even ponytails. Taking a small section from the bottom of each ponytail wrap the hair around the elastics. Bunching wrapped hair against your head tie a small elastic securing the wrapped ends around the base of the ponytails and let your wrapped hair loose to cover second elastic.  Once you have two wrapped ponytails begin french braiding top pony tail starting with a small section at the top adding hair from the top ponytail down and adding hair from the second ponytail until you've added all the hair. Pull at the braid throughout until you have a full loose braid and tie off. Spray hair thoroughly and once dried wrap loosely into a bun shape pinning the bun in place at desired bun width.


3 flower updo (long hair prefered)

What you will need
bobbypins
hairspray
brush/comb/bore brush
gel/moose (texture)
hair elastics
babies breath,pearls, hair decorations(optional)
Hair extensions if needed or desired


Texture hair as desired and create a desired width headband section and tie off for later. Create 3 ponytails (pigtails and a center pony)at the nape of the neck. If more width is desired back comb ponytails and bore brush hair smooth. wrap ponytail one into a bun and pull apart and pin into desired rose shape. Continue this with all three ponytail spreading out each bun fluid lovely. Twist headband section at ear to the end and drape over the roses pinning in place. Or create a rope braid headband and twist section at ear to the end and drape over the roses pinning in place. Hair style is finished.

Monday, September 26, 2011

Christina Aguilera Burlesque updo


What you will need

Hair brush/comb
Gel/moose/hairspray (texture)
bobbypins
small clear or hair color elastic
hair embellishments(optional)

Brush hair thoroughly and apply hair texture products throughout. Create a divide down the center to the back of your head in a zig zag fashion. Tie 1 of the 2 sides off for later. Collect hair as if forming a pig tail, release tendrils from the front to the back of your head from your now pigtail side. Without using an elastic create a low braid pigtail pulling your hair up over your head to eliminate bump or bulges later. Repeat instructions from side one with side two. Similar to this.....

 
Bring side one up and over your head like a headband and pin in place curling the ends behind your braid. Bring second braid over in front of the first one pinning the braid base to your first sides ends. Bring completely over your head and tuck ends behind and under into first braid and pin in place. Check hair, to insure head band looks fluid. Your can curl the tendrils or leave down as is.

Sunday, September 25, 2011

French fishtail braid

What you will need

Bobby pins
Gel/Moose/Hairspray
Hair elastic
Brush/Comb
Hair decorations(optional)


  1. Choose a section of hair where you want the braid to start. Most fishtail braids begin at the hairline, so choose a central point and divide it into two even sections. Make sure to remove tangles from both sections by combing thoroughly.
  2. Cross the right section over the left one. Pull the sections away from each other when tightening the braid. Lift a small section of hair from the right section hairline to the middle of the braid by using the end of a rat-tail comb. If you want a more intricate look, pull thinner strands. If you want a more woven appearance, add more strands. Add the new section of hair to the existing right section and cross it over the left section, tightening the braid as you go.
  3. Use the end of the rat-tail comb again when lifting some strands of hair on the left section and drawing a line from the hairline to the middle section. Even it out with the section you’ve lifted from step 2. Add the lifted hair to the existing left section and cross it over to the right section.
  4. Repeat steps 2 and 3, continuing to alternate right and left sections. Make sure to tighten each plait as you progress until you reach the hairline at the back of your neck (the nape).
  5. Secure the remaining hair with a hair elastic or keep the remaining hair hanging free. You can also weave a basic braid to the ends to hold the fishtail braid together. Avoid using office rubber bands when holding the braid as this could damage your hair. You can use bobby pins in securing loose or fly-away hairs.

Fish braid updo ideas

What you'll need
Bobby pins
Elastics
Hair spray/Gel/Moose
Hair decoration (optional)
Hair brush/comb

Alone a fish tail braid can be a beautiful hairstyle however with just a few additional steps it can become an elegant updo.


  • Braid ponytail 3/4 way down pony and tie down with elastic. Separate braid pulling gently at each section of the braid until it is loose and full

This is the closes pic i could find i like it a little more elegant looking.
  • Braid ponytail 3/4 way down pony and tie down with elastic. Separate braid pulling gently at each section of the braid until it is loose and full. twist into a loose bun and pin in place.


  • ( If you have thick hair separate into two braids if not only make one braid.) Pull hair into a high ponytail and fishtail braid 3/4 way down. Separate the braid pulling gently at each section until braid is full. drape over head toward the front tuck ends under the braid and pin in place for a catwalk like hairstyle. If you created two braids pull forward one on the left side one on the right top of your head for a fuller hawk.


  • A side ponytail fishtail braid without the top elastic is a beautiful look.

Beautiful rope braid

What you will need

Hair elastic
Bobby pin
Hairspray/Gel/Moose
Hair brush/comb

This rope braid is a bit more difficult but worth the effort.

Separate the ponytail into 3 strands. Hold 2 strands in the left hand and 1 in the right hand.
Rope Braid tutorial step 1
2. Wind the strand in your right hand around your index finger to the right. Then switch hands so that all 3 strands are in your right hand, separated with your fingers. Hold onto wound strand, so it does not unravel.
Rope Braid step 2
3. Bring the wound strand over so it is now on the left. Then switch all 3 strands back to the left hand.
How to make a rope braid step 3
4. Now your right hand can wind the right strand again. Repeat steps 2 and 3 to the end of the ponytail. Do Not release or the rope will unravel!
Step 4 How to Rope braid
To secure Rope, fasten with a tight elastic

Fishtail braid

What you will need

Hair elastic
Gel/Moose/Hairspray
Bobby pins
Hair decorations(optional)

A fish tail is a fun hair style that you can make your own in many creative fun way.

Once you have separated the ponytail, you are going to start out by holding the 2 strands in your left hand.
Fishtail Braid step 1
2. Now you are going to take a thin piece from the outside of the right strand and join it with the left strand.
Fishtail Braid step 2
3. Reverse how you are holding hair and switch hands.
Fishtail Braid step 3
4. With your left hand take a thin piece from the outside of the left strand and join it with the right strand.
Fishtail Braid step 4
5. You are going to repeat steps 2 and 3 until the braid is as long as you desire. Then finish with an elastic.
Fishtail Braid step 5


Rope braid head band

What you will need

Hair elastic
Bobby pins
Gel/Moose/Hair spray
Hair decorations.

At desired starting point for braid section two pieces of hair and twist the front piece back and over the other one. add hair and bring the now front piece over and back. Continue this around your head tie off with an elastic and either bobby pin down in place or taking a piece of hair from the base of your neck elastic braid to piece at base of neck not too tightly or it will stick straight out.

Reverse braid or Dutch braid.

What you will need

Hair elastic
Bobbypins
Gel/Moose/Hairspray
Hair decorations(optional)

A reverse braid or dutch braid is very similar to a french braid. The only difference is instead of bringing the hair over and into the middle bring it under and into the middle.

How to french braid

What you'll need

Hair elastics
Hairspray, Gel, Moose
Bobbypins
Hair decorations(optional)

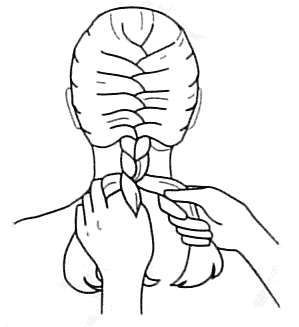
A french braid is a bit intimidating but its simply a matter of practice. Begin hair as normal braid splitting hair into three sections. Complete one braid bringing the outer third over the middle one then inner third over the middle one. As you begin the second braid add hair to the outer third and bring over and into the middle, add hair to the inner and bring it over and into the middle. Continue this all the way down..
Add
Over and into the middle
Add
Over into the middle.
...And so on
When you run out of hair to add simply normal braid down to the ends and tie off.

That's it.

Here is a visual step by step:

1. Start by taking a section from the top of the head. Separate this section into 3 strands crossing right over middle and then left over middle, as if you were doing a Basic Braid.
Picture 1 French Braid your hair
2. Switch all of the strands over to your left hand and keep strands separated.
Picture 2 Keep the strands separate
3. You can now gather a small even section from the right side of the head with your right hand and add it to the right strand.
Picture 3 Gather a small section
4. Bring the strand you have just added to, over to the middle and bring the middle strand to the right.
Picture 4 Bring the middle strand to the right
5. Now switch hands keeping all strands separate, so your left hand will be free.
Picture 5 Keep strands separate
6. Gather a section of hair from the left side of the head. Add this to the left strand.
French Braid picture 6
7. You will now bring the left strand over to the middle and bring the middle section to the left. As you follow these steps, try to keep your hands close to the head so the braid will be tight.
French Braid step 7
8. Repeat steps 2 and 3 until there is no hair available to add. Finish style with a Basic Braid and fasten with an elastic.
French Braid step 8


Beautiful ponytail

What you'll need
Bobbypins
Hairspray/moose/gel
Brush/comb
Elastic
Rat tail comb/pen/chopstick

This is another hairstyle that you can make your own, decide what fits your personality. I will give you a few ideas to get you started. With each style curling ends and adding a bump is a fun addition.
Part desired side of the front headband section and using rat tail comb (chopstick/pen), decide your desired width of braid and part hair equally down the side of your head just behind your ear. Tie the rest of your hair out of the way. You can French braid, dutch braid, rope braid, or headband section.

Once you reach the ear continue braiding until you reach the ends and tie off with small elastic. Release the back section of hair and brush into desired pony tail. High, low, center, side it's all about what fits your style. Wrap braid around hair elastic and bobbypins securely in place. Pull hair into a full ponytail (again decide where you want it make it your own). Taking a section from underneath the pony wrap around elastic. You can either bobbypin or push the wrapped hair against head or tie a small elastic around pony and wrapped ends. Pull gently the wrap pony around the elastic. Add a flower or decoration to side of pony tail for added flair. Braiding the underneath section is also lovely.

Pull hair into a full ponytail (again decide where you want it make it your own). Taking a section from underneath the pony, wrap around elastic.  You can either bobby pin or push the wrapped hair against head.  Tie a small elastic around pony and wrapped ends. Pull gently the wrapped pony around the elastic. Curl completely the ponytail. Wrap the top thin layer of the ponytail up over the elastic and pin in place.


Saturday, September 24, 2011

French twist a few ideas

What you'll need:
  • Bobbypins
  • Hair gel/hair spray/moose
  • Brush/comb
  • Curlers/curling iron
  • Hair decorations (optional)

A french twist is an elegant hairstyle that is great for formal to casual events. A french twist can be done with just above shoulder length and longer. To create a french twist brush, add styling product for texture and collect hair into a low ponytail and twist. Spreading hair up and over the twist as you twist, pin into place. the ends are optional:
  • Curl the short hairs poking out
  • Roll around finger and pin or cinch ends
  • For longer hair twist hair back into its self and pin into place adding volume to the style
For the bump lover section a small section at the bang section of your head and twist or back comb section and push forward to desired height. Follow the french twist directions gently adding in remaining hair from the bump.

For a more elegant look reverse french twist instructions direction starting at the top of the head twisting downward. Leave hair out and curl ends.

For a more casual look section hair from the bottom of ear to ear and follow the french twist instructions. curl the lower section of the hair.

(shorter hair)For a more elegant look section three large sections from each side of your head, top and pin away for later. Follow the french twist instructions with remaining hair. Spray one of the side sections with a sleek coat of hair spray and comb over twist. Spray hair again to insure hold and sleek hair avoiding fly aways and bumps. Comb first section as far over as it will go and pin into place securely. Bringing the second side section over repeat the same process you just finished with the first section. Bringing hair across the french twist and curving up towards the top section just above the ear. Coat top section with hair spray and smooth hair to secure hold fly aways and bumps and pin in place. Release top section and back comb to desired height a front bump or poof. Curving hair over ends of second section roll the top section ends into a delicate soft roll. pin into place. Spray again for a secure hold and hair style is complete.

A double french twist is also a fun look. Split hair into two pig tail like section down the center of your head. Follow the french twist instructions with each section and pin in place to secure.

Follow the french twist instructions, with shorter hair instead of curling atop your head pull your hair back into itself leaving little sections at the side of the french twist out all the way and tightly curl ends for a soft angelic look.


A french twist is a wonder style to create and make your own with endless possibilities. Have fun try your own take on the french twist add your own style of decorations and make it your own. French twist from side to side instead of up and down, leave out little tendrils, Make a large statement with a high bump or curls its whatever you can imagine it to be.  Most importantly have fun.