Sunday, October 30, 2011

Evil Clown horror mask

What you'll need
White,red,black face paint
Black eye/gel liner
Fake blood
Make up applicator
blue eye shadow
light pink blush
White eye liner pencil
Make up brushes to draw lines and smoke out makeup


Completely cover your face and down your neck with white face paint. Taking your eyeliner trace along your water line and with liner or gel liner cover your entire lid.Taking your brush smoke out the eye liner up to the highlight section just bellow your eye brow and around your eye. Taking your eye liner pencil draw two long triangle like shapes pointing up and down each eye (example on the left eye draw a long triangle on the outer edge of the eye facing down and shorter but still long triangle going up at the tear duct side of the eye) filling in the triangles with black gel/eye liner. Draw dark expressive eye brows over your existing eye brows. With your shadow brush create demention around your eye with your blue eye shadow.  Taking your eye liner draw the outline of a very large Clown like mouth outline. Taking your eye liner or gel liner draw jagged diamond like teeth over your lips (but not excluded to just your lips) fill in your human lips around your drawn teeth with black paint or gel liner. taking white paint or white eye liner fill in the painted teeth to make them really pop. Fill in your new drawn lips with red face paint. Taking black face paint create shadows on your lips for dimension. With your liner draw a circle around the tip of your nose filling it in with red face makeup(if you don't have red face makeup use red lipstick) Taking your eye liner create expressive lines over your face to create the permanent expression you want.  Add blush to cheeks and fake blood along the bottom of your eyes like your crying blood. Like I always say make it your own.
Example: with eye liner create the desired shape you would like your eye make up to take and fill in as desired.


As with the elegant mask tutorial place a stencil,lace or anything with decorative holes against your face and brush over with eye shadows or makeup along your temples, forehead or cheeks. Make it yours enjoy 


Saturday, October 29, 2011

Elegant Party Mask without the discomfort

What you will need
Black or desired color rhinestones
Lash glue
False eye lashes
Black lipstick
Black eye liner
Black eye shadow
Desired color of dazzle dust
Thin eye shadow brush


Taking your eye liner draw the desired shape of a mask you would like to wear on your face or if needed get someone to help you with this. Taking your black lipstick fill in the mask completely leaving of course the eye holes untouched.("The eye holes were my idea" desert star's playhouse Zorro quote for the fam) and go over your mask with black eye shadow. Taking your black eye liner go back over and define the mask again for clean crisp lines. Apply eye liner if your mask is a cat eye like shape creating an angled eye is recommended and like wise a circle eye hole is great with a natural eye liner look. Apply eye liner to your water line or lower lash line and if desired create small lash strokes with your liner to extend your bottom lashes to make your eyes pop. Apply your false eye lashes if they are new gently bend them around a bit so that they will adapt to your eye shape. Taking your dazzle dust or pigment and create desired designs on your mask you can create a mirror effect or your own design on either side of your mask its up to you. Taking the back of your eye shadow brush apply small dots of Lash glue to your skin just out side your mask around your mask I recommend doing 5 dots at a time and then applying the rhinestones or your glue may dry before you are done. Once you have bordered your mask with the rhinestones your finished. Like I always say make it your own it doesn't have to be black add the rhinestones atop your mask. Another fun trick for face painting is to lay a some lace or any textured or cut out shape and lay it securely on your face and paint or dazzle over that onto your skin or painted skin. Feathers like the picture just bellow can be purchased I believe i got mine at Micheal's crafts and added to a mask for a lovely addition  just have fun and enjoy.

Halloween bloody nail


What you'll need
eye lash glue
blood red lipstick
at least one press of french tip nail per finger you wish to do this to
Red food coloring or fake blood
Cotton ball
scissors
black lipstick
small eye shadow brush
mail clippers and or nail file

File desired nail down completely to your finger tip. Find the fake nail that fits exactly to your real nail you just filed down. Trim off the white tip and rip the nail in half length wise the more jagged the better. With eye lash glue over entire nail attach the nail to your finger lining it up as if it were your own and press down hard insuring it sticks. Pressing down and pulling apart the cotton ball on remaining side to create texture (to the real nail side). With your make-up brush apply the blood red lipstick to your remaining cotton covered nail side trying to get it just a bit under the false nail dabbing it along the cuticle and rubbing it in to create a redness and "irritation" to it. Taking your eyelash brush again to your black lipstick and dab it along the cuticle for a dried blood look. Rip the remaining piece of your false nail in half width wise. Pressing again pieces of cotton ball for that textured look on your lipstick nail side. Taking the bottom broken piece apply eyelash glue and attach it to your finger along the cuticle attaching the bottom but insuring the top is lifted just a bit off the nail. Apply nail glue on top of this last nail along the cuticle to secure the hold. Taking your food coloring or fake blood drip it down into the raised nail and along the just glued line atop the last nail making it look really gory and bloody. Smudge dry any "blood" on your finger for a truly bloody look. Your Done. enjoy

Baby/anime/goth doll Halloween


What you'll need
white eye liner/eye shadow
Black eye liner
Black eye shadow
red lipstick/gloss
Concealer
Gel/moose/hairspray
optional but recommended dramatic circle contact lenses
liquid and powder foundation
reddish brown eye shadow or lipstick
Multiple fake spider like lashes
Wig or curling iron if own long hair is preferred
Bonnet and costume of choice
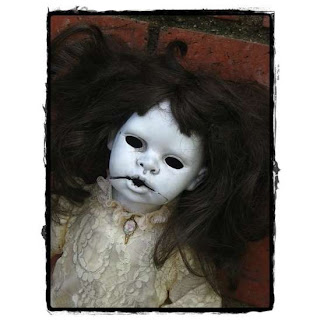
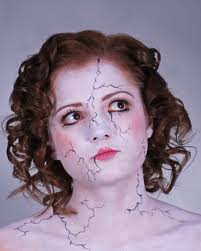
To begin With foundation brush cover face(eye brows and lips as well) with a thick coat of liquid foundation(a shade or two lighter then your own skin color is nice for a more porcelain look) you want your face to look as fake and doll like as possible. Apply powder foundation, draw dramatic thin eye brows. Fill in lightly entire eye lid excluding the highlight section just bellow the eyebrow with your reddish brown lipstick or eyeshadow. Create a cat like eye liner coming up half way up your eye lid creating dramatic points  on either side coming down bellow your lower lash line and fill in with black liner. Fill your lower lash line with white eye liner or shadow.
Apply lashes to the eye liner line midway up your eye lid and at the new bottom lash line. Continue applying multiple layers of lashes until you achieve desired look. Create desired lip ship with red lipstick or lip liner if available and fill in, at the center of your lips fill in with black eye liner and apply favorite red lip gloss over entire painted lips.
did the best i could with what i could find sorry
 With concealer fill in your remaining natural lips to conceal and create a fluid look.Apply a soft thin layer of baby soft pink blush to the apples of your cheeks. Apply wig or curl hair in long dramatic ringlets applying your favourite texture products to insure hold. For a cracked more goth or Halloween looking face. create desired rough and uneven diamond shape(or desired crack shape) on cheek with an eye liner pencil or liquid eyeliner and fill in. With a gentle hand create cracks from the now missing doll piece of the face just a few from the corners, some longer then others almost like branches. Adding a crack just bellow the opposite sides lip or crack down the cheek bone or temple is also nice. going back in with black eye shadow to create a highlighted look create a highlight space and like a  "shadow" shadow the lines you created to make them really pop. If desired concealer can also be used in the highlighted space if there was any smudges or just to make it pop. Add contacts and and your costume and your finished. Have fun with it add freckles, use grey and black instead of reddish brown on your lids for a more goth look, use one full eye black contact for a darker look Enjoy.

Thursday, October 27, 2011

Full voluminous updo

What you'll need
Brush/comb
3 Small elastics
Hair clip
Hairspray,gel,moose

Make a V section at the top front section of your hair and clip it out of the way. Create three equal vertical ponytails.  Collect the top two ponytails and clip out of the way. Take the bottom ponytail and twist it as if creating a hair bow.
Pin in place, Bring ends over to the other side of the elastic and twist another bow like twist pin in place. Making the first twist a bit larger. Repeat with the next two pony tails the same way Alternating the twist. So that the larger twist is alternating up your head.

 Pull at the twists to create a full large bun like style. Drape the V section to the side and back and pin under the full pun. Roll ends against the bun pinning in place and pull apart


Wednesday, October 26, 2011

A request

 
I have received a few requests for this Kim Kardashian hairstyle.


What you will need

Brush, comb

A long ribbon, scarf

Small hair elastic hair color, ribbon color, or clear

Hair clip

I have broken it down into 3 versions depending on what fits you and your style/abilities

1. The ribbon should be a couple inches longer than your hair when braided it will shrink once hairstyle is complete you can trim the ribbon. Create a part down the center of your head and fold ribbon in half to find its center. Place the center of the ribbon at the top part of your head as if it were a headband. Pin the Ribbon or scarf to the left side part and take a section of hair on the right side of your part from about the brow arch and back about a pinky length back. Split the hair in half laying the ribbon down the center and begin braiding using the ribbon as the third strand. Once you've reached the end tie off with a small elastic, trim away any extra ribbon length insuring not to cut the hair. Repeat the section on the left side insuring the section is exactly the same as the right. Repeat the braid on the right side. This is a boho look so don’t worry about the remaining hair looking perfect allows it to fall naturally.


If you struggle with the ribbon here is an alternative way to achieve this hairstyle. 


2.  The ribbon should be a few inches longer than your hair when braided it will shrink once hairstyle is complete you can trim the ribbon Create a part down the center of your head, take a section of hair on the right side of your part. From about the brow arch and back about a pinky length back and tie off with a small elastic to create a pony tail. Repeat the section on the left side insuring the section is exactly the same as the right. Fold ribbon in half to find its center. Place the center of the ribbon at the top part of your head as if it were a headband tie a knot around the left ponytail with the ribbon insuring that the ribbon across the head does not twist. Using the ribbon as one of the three strands braid the left ponytail and tie off at the end with elastic. Tie the ribbon around the right ponytail and repeat the braid on the right side. This is a boho look so don’t worry about the remaining hair looking perfect allows it to fall naturally.

3. This last version is for the more "princess" look perfect for Halloween just around the corner. A thicker ribbon or scarf is better for this style but a thin ribbon can be used. The scarf should be a couple inches longer than your hair when wrapped it will shrink a bit once hairstyle is complete. Create a part down the center of your head and fold scarf in half to find its center. Place the center of the scarf at the top part of your head as if it were a headband. Tie the right side of the scarf to your hair with an elastic, On the left side part and take a section of hair on the right side of your part from about the brow arch and back about a pinky length back. Split the hair in half laying the scarf down the center wrap the front section back around the scarf and bringing it back around to the front. at this point cross your hair over the scarf forming an X bring it behind the scarf and for another X. continue this all the way down to the ends and tie off with an elastic. Releasing hair on the right side Repeat what you just did with the left. Now at this point you can leave down or if you want a softer more out of the way princess look bring the scarf ends together gently in the back and tie off bobby pinning in place where you want the ribbon to rest along your head for a softer lower draping or a tighter higher look.

Friday, October 7, 2011

Basket Weave braid

What you will need
gel/moose/hairspray
comb/brush
elastic
bobbypins optional

To create a a basket weave braid, Brush through and texture desired braided section. Taking desired width of braid section into multiple small section. Taking the outer section weave back through the multiple small sections and hold in place. take the next outer hair section weave back through the multiple small sections reversing where you went over go under where you went under go over.  repeat this until you reached the disired legth of braid.  Make it your own, you can pull at the braid to create large loops. you can pull at the outter rings for a more dramatic look.

French Braided basket weaved updo

What you'll need
Gel/moose/hairspray
bobbypin
brush/comb/rat tail comb
hair elastics
hair decoration(optional)
hair clip(to clip hair out of the way)


Brush hair throughout and apply desired texture product. Create a part at the crown of your head from ear to ear. Brush the back section into a pony tail at the crown and leave it for later. Part the front section on desired side just above the eyebrow arch. Taking a small section from your hairline at the top of the part hairspray section and begin your weave taking the rat tail comb at the top of your part, In equal sections go over/under over/under until you've reached the part. Pin the weaved section of the hairline ends at the top of the ponytail. Taking the rat tail comb reverse the basket weave pull the top sections of the basket weave over and clip out of the way taking a small section at the hair line spray with hairspray and pull it back over the ends you went under just before and pin at the pony tail elastic. Release the hair you clipped out of the way you should now have two basket weaved sections. Taking a rat tailed comb (at equal width with other two) weave reversing the previous section(where you went over go under where you went under go over) Clip the over sections up out of the way, pull a small section at hair line over where you went under just before hair spray and pin to hair elastic. Release clipped hair creating a third basket weaved section. Continue this until you reach the end of the part behind the ear. Basket weave braid the woven ends (if you don't know how i explain it in my basket weave braid blog) pin at the nape of your neck if hair is longer then the nape create a spiral with remaining ends and pin in place.  Repeat the basket weave,braid and spiral on the other side. Take the top three ends you pinned at the elastic and braid add the next pinned ends into a french braid when you run out of ends incorporate the hair from the pony tail in small sections so that your still adding hair just above the pony tail ends. Pull up at the base of the braid this should flare the braid out beautifully and pin just above the ponytail. Curl the ends of the braid under and pin against the nape of your neck.


Thursday, October 6, 2011

Fish Scale French Braid

What you'll need
small clear or hair colored elastics
Moose/hairspray
Brush/comb

Brush through hair and texture with desired products to eliminate fly aways and insure hair looks as desired. Create a V section at the top of your head, set aside for later. At the outer part of your eyebrow arch slide your finger up through your hair at an angle to the center part on each side and french braid to the crown. French braid the center section to the crown of your head, taking a small section from the left braided section ends incorporate into the center french braid. Taking a small section from the right braided section ends incorporate into the center french braid. Repeat this until you run out of the outer braided ends. Taking a small section just under the outer braids along the hairline incorporate it into the french braid. Continue this taking only small sections from along your hairline and bringing them over the remaining hair and incorporating it into the french braid. Once you've collected the last sections at the nape of your neck finish braid to the ends. Hair spray finished hair and your finished.


Wednesday, October 5, 2011

Roll updo

What you'll need
bobby pins
hairspray/moose
brush/comb


Brush hair to remove snarls and apply texture products throughout.  Create your desired width and pin  headband out of the way. Back comb entire remaining hair, with your hand push down back combed hair and pin in place just behind the ear. Pin another pin from the center of the last and continue this until you reach the center of your head. Starting at the other ear pin going the other direction repeat the pinning process going the other direction and cross center pins for a secure hold. Separate hair at the center and create two rolls by gently wrapping into a tube like shape and roll upwards and pin to your head covering the row of bobbypins. Repeat rolling the other side. Release headband section and create desired part, twist each side back and to the ends. Pulling at the twisted hair releasing curl like sections through out drape over the rolls you just created and pin in place.
Published with Blogger-droid v1.7.4

Knotted updo

What you'll need
bobbypin
brush/comb
gel/moose/hairspray(texture)
hair decor(optional)

Brush hair and texture throughout. At desired starting point take a finger to two finger width section of hair. Tie hair into a knot just behind your ear at the nape of your neck, pull knot into desired shape and bobbypin in place. Adding the ends of the last knot continue this around your head each knot at the nape of your neck. At the last knot twist hair pulling at the twisted hair releasing small sections and tie tightly twisted and released hair into a knot. Pin ends under knots and hairstyle is complete. Add hair decor if desired.

Runway inspired braided updo

What you will need:

Elastic
Hair gel/moose/hairspray
Brush comb
Bobbypins
Hair decoration (optional)
A chair or something to sit on...trust me

This is a fun sexy hairstyle and so easy to do.
Flip your head upside down and brush through hair completely and add chosen hair product to texture it. Begin at the base of your neck and reverse french braid or dutch braid hair working your way up your head. When you reach your crown begin incorporating the rest of your hair so that when you reach the top of your crown all hair is included. Pull at sections of the braid to create a loose rings braid. Continue pulling on the braid past the crown of your head to create large rings in your braid and tie off. Flip your head upright and drape your braid over itself and tuck ends under to hide.

Knot updo/half updo

What you will need
Bobbypin
Hairspray/Gel/Moose
Brush/Comb
Hair elastic

Taking the top fourth of your hair split top section into thirds. Drop center section, tie the two outer sections into a knot(knotted ends should be in the top/bottom part of the knot). Gently back comb slightly the top end of the knot to insure hold and stability and bobby[in place. Taking the next fourth of your hair split section into thirds. Drop center section, tie the two outer sections into a knot(this knot's ends should be on the left/right side of the knot)over the first knot ends bobby pin in place.  Now you can either leave as is as a half up half down updo or continue to tie the second section until you have a good inch of hair left. wrap around remaining hair until you reach the ends combined behind the hair back comb to secure hold and pin in place. For a more dramatic look back comb remaining hair ends and smooth.

Have Long hair but miss the short bob hair look. Before you go to the salon try this runway inspired hairstyle

WARNING: THIS HAIR STYLE INVOLVES INTENSE BACKCOMBING

What you'll need
Brush/Comb/Bore Brush
Hairspray
Bobbypin
Moose if preferred
hair elastic, clip or ability to braid
Texture hair throughout, Brush hair and create a part on desired side of your head. Using the side of the part with the most hair section off desired width and clip off for later if you do not have a clip you can braid hair half way down to secure hold. Taking remaining hair in small sections and back comb to the point it stands straight up and spray to secure hold with hair spray. Back comb entire head(not including hair you set aside)
Stay with me I realize its a bit extreme. Starting on the small parted side gently roll hair under loosely. Pinning in place as you go. When you reach the end roll up the side of your face pinning in place. Release clipped or braided section and gently back comb bang area and spray for volume. Gently brush smooth and loosely and gently drape over roll along side your face and pin twisting slightly and pin in place. Create a swirl for added style pin and place and spray for hold.   

Tuesday, October 4, 2011

French Braided bun

What you will need
bobbypins
brush/comb
gel/moose/hairspray(texture)
hair elastics small and large

Brush through hair and texture as desired, split hair  into two vertically even ponytails. Taking a small section from the bottom of each ponytail wrap the hair around the elastics. Bunching wrapped hair against your head tie a small elastic securing the wrapped ends around the base of the ponytails and let your wrapped hair loose to cover second elastic.  Once you have two wrapped ponytails begin french braiding top pony tail starting with a small section at the top adding hair from the top ponytail down and adding hair from the second ponytail until you've added all the hair. Pull at the braid throughout until you have a full loose braid and tie off. Spray hair thoroughly and once dried wrap loosely into a bun shape pinning the bun in place at desired bun width.


3 flower updo (long hair prefered)

What you will need
bobbypins
hairspray
brush/comb/bore brush
gel/moose (texture)
hair elastics
babies breath,pearls, hair decorations(optional)
Hair extensions if needed or desired


Texture hair as desired and create a desired width headband section and tie off for later. Create 3 ponytails (pigtails and a center pony)at the nape of the neck. If more width is desired back comb ponytails and bore brush hair smooth. wrap ponytail one into a bun and pull apart and pin into desired rose shape. Continue this with all three ponytail spreading out each bun fluid lovely. Twist headband section at ear to the end and drape over the roses pinning in place. Or create a rope braid headband and twist section at ear to the end and drape over the roses pinning in place. Hair style is finished.

Saturday, October 1, 2011

Beautiful braided bun

What you'll need
Small clear or hair colored elastics
Brush/comb
Gel/moose/hairspray (texture)
Bobbypins (optional)
Brush through hair removing all snarls and texture. Split hair into three sections( pigtails, center). Braid each section to the ends. Collecting all the braids wrap into a large loose bun and pin in place.  Make it your own add flowers, babies breath,head band,hanky. Spread braids out over head, keep braids together, use alternate braids..its all up to you.

Half updo side flower

What you'll need
Brush/comb
Gel/moose/hairspray (texture)
Rat tail comb/chopstick/pen (parting tool) Small elastics clear, hair color
Bobbypins
Curling iron/curlers(optional)

Brush hair and apply texture. On the side you desire your flower, make two small sections just above your ear. Braid each section to create two small braids tie off each with small elastic. Just above braids start a head band rope braid. If you don't know how I have a how to blog. When you reach your ear split into three section and normal braid down to to end. Pull across the back of your head just behind your two small braids and pin in place. Wrap ends into a bun where you want your flower. Twisting your braids into a bun place over your wrapped ends. Create desired flower look and pin in place. As I always say make it your own, play around with the Braiding headband. Add decorative embellishments whatever speaks to you.


Tired of headband slipping or disrupting your hairstyle? I've got your hairstyle solution with my sexy corset lacing

What you'll need
Brush/comb
Gel/moose/hairspray (texture)
Long thin Ribbon of desired color
Rat tail comb/chopstick/pen (parting tool)
Small elastics clear, hair color or ribbon color
Crochet hook (if you have one on hand)
Part a zig-zag (desired width) headband part from ear to ear. French braid headband from one ear to the other, braid down to the ends.  Part a second zig-zag head band directly behind the first. French braid the second headband, Braiding down to the ends. At this point you should have two French braids beginning and ending in the same direction. Taking your crochet hook or "parting tool" wrap ribbon around the tool and feed through each beginning point of braids(like starting shoe laces). Every third braid loop lace ribbon through braid crossing ribbon between each lacing. Continue this all the way down to the ends and tie ribbon as desired. This is a fun look kept down to the side or pinned under remaining hair at the nape.
As I always say make it your own, French braid pigtails and weave down the back. French braid two sections on one side of head and weave for a sexy corset look to add to any updo or half updo.