Showing posts with label hairstyle. Show all posts

Wednesday, October 26, 2011

A request

 
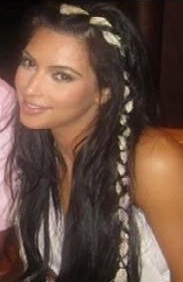
I have received a few requests for this Kim Kardashian hairstyle.


What you will need

Brush, comb

A long ribbon, scarf

Small hair elastic hair color, ribbon color, or clear

Hair clip

I have broken it down into 3 versions depending on what fits you and your style/abilities

1. The ribbon should be a couple inches longer than your hair when braided it will shrink once hairstyle is complete you can trim the ribbon. Create a part down the center of your head and fold ribbon in half to find its center. Place the center of the ribbon at the top part of your head as if it were a headband. Pin the Ribbon or scarf to the left side part and take a section of hair on the right side of your part from about the brow arch and back about a pinky length back. Split the hair in half laying the ribbon down the center and begin braiding using the ribbon as the third strand. Once you've reached the end tie off with a small elastic, trim away any extra ribbon length insuring not to cut the hair. Repeat the section on the left side insuring the section is exactly the same as the right. Repeat the braid on the right side. This is a boho look so don’t worry about the remaining hair looking perfect allows it to fall naturally.


If you struggle with the ribbon here is an alternative way to achieve this hairstyle. 


2.  The ribbon should be a few inches longer than your hair when braided it will shrink once hairstyle is complete you can trim the ribbon Create a part down the center of your head, take a section of hair on the right side of your part. From about the brow arch and back about a pinky length back and tie off with a small elastic to create a pony tail. Repeat the section on the left side insuring the section is exactly the same as the right. Fold ribbon in half to find its center. Place the center of the ribbon at the top part of your head as if it were a headband tie a knot around the left ponytail with the ribbon insuring that the ribbon across the head does not twist. Using the ribbon as one of the three strands braid the left ponytail and tie off at the end with elastic. Tie the ribbon around the right ponytail and repeat the braid on the right side. This is a boho look so don’t worry about the remaining hair looking perfect allows it to fall naturally.

3. This last version is for the more "princess" look perfect for Halloween just around the corner. A thicker ribbon or scarf is better for this style but a thin ribbon can be used. The scarf should be a couple inches longer than your hair when wrapped it will shrink a bit once hairstyle is complete. Create a part down the center of your head and fold scarf in half to find its center. Place the center of the scarf at the top part of your head as if it were a headband. Tie the right side of the scarf to your hair with an elastic, On the left side part and take a section of hair on the right side of your part from about the brow arch and back about a pinky length back. Split the hair in half laying the scarf down the center wrap the front section back around the scarf and bringing it back around to the front. at this point cross your hair over the scarf forming an X bring it behind the scarf and for another X. continue this all the way down to the ends and tie off with an elastic. Releasing hair on the right side Repeat what you just did with the left. Now at this point you can leave down or if you want a softer more out of the way princess look bring the scarf ends together gently in the back and tie off bobby pinning in place where you want the ribbon to rest along your head for a softer lower draping or a tighter higher look.

Saturday, October 1, 2011

Beautiful braided bun

What you'll need
Small clear or hair colored elastics
Brush/comb
Gel/moose/hairspray (texture)
Bobbypins (optional)
Brush through hair removing all snarls and texture. Split hair into three sections( pigtails, center). Braid each section to the ends. Collecting all the braids wrap into a large loose bun and pin in place.  Make it your own add flowers, babies breath,head band,hanky. Spread braids out over head, keep braids together, use alternate braids..its all up to you.

Friday, September 23, 2011

Topsytails

What you'll need:

Hair elastic
bobbypins
brush
decorative embellishments, ribbons, curling iron/curlers, etc. (optional)

Topsytails are one of those great styles that you can make your own with just a simple twist. I'm getting ahead of myself, though.  A topsytail is collecting your hair into a ponytail then loosen the elastic about two finger widths from your head. Split the ponytail in half from top to bottom and collect all your hair and loop it through the opening you created. Now with this knowledge you can let your imagination take over and create some wonderful hairstyles. A few ideas are :
  • Follow the topsytail instruction and tuck your hair from top to bottom then pull ends of your hair to tighten hold. Curl ends and add a few decorative touches.
  • Follow the topsytail instructions before tucking braid ponytail. Tuck braid and wrap up again and pin into place. A ribbon or scarf is also a lovely addition. Tie off an elastic and use the ribbon or elastic as a section for the braid.
  • Double topsytail is a fun style.  Section a princess part of your hair and follow the topsytail instructions. Collect the rest of your hair in a low ponytail and follow the topsytail instructions.


You can also create a headband section from behind your ears and pin it for later. Follow the topsytail instructions  with back section. Now this style can be done in two ways: curl the ends or when you tuck hair do not pull through and bunch all of your hair.  Pick the best side you want your split on and create a rope braid with the first side. Taking a small chunk at the beginning of the part twist hair and with each twist add a small chunk of hair until you reach your ear. Collect hair and loosely twist and tuck into your topsytail and pin in place. Taking the small chunk on the other side of the part and rope. braid and repeat.

Monday, September 19, 2011

Rocker Style

What you will need:

Rat tail comb/pen/chop stick.
Small elastics
Bobbypins

There are a few ways to complete this style.

Section a V shape section at the top of your head and tie off for later. At the back point of your V section from that point down behind your ear, tie off the back section of your hair. At this point you should have the top section, the two side sections, and the back section separate; the side sections into 3 from front to back. Here is where it differs-

  • You can rope braid all 6 sections front to back and tie off with a small elastic.
  • You can simply pull back into 6 pony tails.
  • You can french braid each section
Have fun with it and make it yours.  Back comb the V section into a poof.  You choose the height. Pin that down a couple inches from your bangs. The poof behind the pinned down section should still be full. Back comb where needed to create the desired look. The back section can be let down with sexy curls, straight and sleek, or follow my hawk directions and create a party night hair style that rocks.

Pin up look

What you will need:
Gel/moose
Hair brush
bobbypins
Hair elastic preferably your hair color
curling iron/curlers


An easy pin up look is to collect hair in a high pony tail. Pull half way through on the last twist of the hair elastic and let it fall forward to create a large poof at bang area. Pin in place and leave as is or tie a wrapped bandanna to help hold and conceal hair tie.  If you want the half up half down look simply grab the top princess section or third and pull the top and follow the the same steps. Curl bottom section and hair spray to hold.

Another pin up look is to split a top princess section of hair to elastic bottom section out of the way. Split top section into three and roll each section back into large rolls and pin to secure. Two on each side and one on top.  Curl bottom section and hair spray to hold or curl or roll the bottom section up into a lovely roll and pin to secure.

Greek hair style

What you will need:
bobbypin
brush/comb
gel/moose
small elastic
Hair decoration(optional)


This one is fun and easy... If done correctly it looks flawless and fluid.  Take two small sections at the top of your head and twist either counter clockwise or clockwise depending on the direction;  moving front section back. After twisting, add hair to section and twist then move on to next section of hair, add, and twist and so on around your head maintaining the same direction with each twist. Once you have come all the way around to the end of your hair tuck under and pin to create the endless fluid look. When you feel comfortable with that try a french a braid Greek crown. Or my favorite section, a circle at the center of the back of your head and pull it into a pony tail.  French braid the hair left remaining by only adding hair from your pony tail.

Sunday, September 18, 2011

An additional knotted hair style.

What you will need:
hair elastic
brush/comb
gel/moose/hairspray
bobbypins
hair decoration(optional)


(Similar to a french braid take each section from the top to nape depending on the detail you desire).

Section small sections of your hair tie in a knot, bobby pin to secure knot. Add ends of previous knot to the next one until you reach the last section. continue knotting down to the ends. wrap remaining hair from neck to ends in a spiral. At this point you can either pin to the side to create a rose like decoration or tuck under braid to make a clean braid.

Another easy knotted hair style

What you need:
bobbypin
hair brush/comb
gel/moose/hairspray
hair elastic lg and small
rat tail comb/pen/chopstick

Pull hair into a single pony tail similar to the first hair style depending on hair length section( hair for long hair into 2 section, shorter hair may need more sections) loosely knot hair a few times loose down to the ends. wrap around ponytail and pin ends out of place. With each hair style a bump just behind or including bangs may be added for additional style.

How I styled my sister in-laws hair for her wedding

What you ll need:
Rat tail comb/pen/chopstick
gel/moose/hairspray
bobbypin
curling iron/curlers (optional)
hair decorations (optional)
Brush/comb


 my take on this hair style.
Divide hair into 3 ponytails clip top and bottom ponytail out of the way. Divide middle ponytail into equal sections depending on hair width tie each section into large loose knots bobypin around hair tie. sectioning the bottom ponytail into small sections split each section into two and tie into multiple loose knots loosely wrap around the center section. Once completed divided top section into 3 sections a small section above each ear. and pull the center top section into a pony tail just above the knotted section. knot the top center section like you did the bottom section around the finished hair. At the base of the head section small sections and knot like you did the last 2 sections from scalp to tips loosely pull back to finished and wrap to hide ends. Finished hair should look like this .